Programming a radio to operate on multiple frequencies is an essential skill for amateur radio operators who wish to maximize their versatility and operational flexibility. Whether you are a beginner or a seasoned veteran, understanding how to efficiently set up your radio for numerous channels and frequencies can significantly enhance your communication experience. This comprehensive guide explores the step-by-step process, best practices, and useful tips to help you program your radio for multiple frequencies effectively.
- Understanding the Basics of Amateur Radio Programming
- What is Frequency Programming?
- Types of Radios and Programming Methods
- Why Program Multiple Frequencies?
- Preparing to Program Your Radio for Multiple Frequencies
- Gather Necessary Information
- Selecting the Right Software and Equipment
- Step-by-Step Guide to Program Your Radio for Multiple Frequencies
- Step 1: Connect Your Radio to the Computer
- Step 2: Download and Install Programming Software
- Step 3: Backup Existing Settings
- Step 4: Load or Create a New Programming File
- Step 5: Enter the Frequencies and Settings
- Step 6: Save and Write Data to Your Radio
- Step 7: Test the Programmed Frequencies
- Advanced Tips for Efficient Multi-Frequency Programming
- Use Named Memories for Easy Identification
- Organize Frequencies into Memory Banks
- Employ Scan Lists and Priority Channels
- Utilize Cross-Referencing and Custom Macros
- Handling Multiple Frequencies in Different Radio Models
- Yaesu Radios
- Icom Radios
- Kentwood Radios
- Common Challenges and Troubleshooting
- Firmware Incompatibility
- Programming Cable Issues
- Incorrect Settings or Data Entry Errors
- Software Conflicts or Bugs
- Legal Considerations and Best Practices
- Becoming Proficient at Multi-Frequency Programming
Understanding the Basics of Amateur Radio Programming
What is Frequency Programming?
Frequency programming involves configuring your radio’s memory channels so that they can be quickly accessed during operation. These stored channels contain specific frequency information along with any associated settings like CTCSS tones, DCS codes, power levels, and mode types (AM, FM, SSB, etc.). Proper programming ensures smooth, reliable, and quick communication without the need for manual frequency dialing each time.
Types of Radios and Programming Methods
Amateur radios come with various programming interfaces, primarily categorized as:
- Computer-Based Programming: Using software or cable connections to program your radio via a computer. Examples include Chirp, CHIRP (free software), and manufacturer-specific tools.
- Manual Programming: Entering data directly into the radio’s keypad and display. Typically used for handheld or mobile radios with limited features.
Why Program Multiple Frequencies?
Programming a set of multiple frequencies allows operators to:
- Quickly switch between repeaters, simplex channels, and Dx stations.
- Monitor multiple conversations simultaneously.
- Prepare for emergency or contingency plans.
- Improve operational efficiency during events or long-distance operations.
Preparing to Program Your Radio for Multiple Frequencies
Gather Necessary Information
Before starting the programming process, make sure you have all the relevant data for each frequency:
- Frequency: Exact frequency in MHz (e.g., 145.000).
- Mode: FM, SSB, CW, etc.
- Offset and Duplex Settings: For repeater channels, e.g., -600 kHz offset.
- CTCSS / DCS Tones: If required to access certain repeaters.
- Power Level and Bandwidth: Especially important for mobile or base stations.
- Name/Label: Descriptive label for easy identification.
Selecting the Right Software and Equipment
Most modern radios can be programmed via dedicated software tools. Confirm your radio model’s compatibility and choose an appropriate programming cable or interface. Popular options include:
- Chirp: A universal, open-source program supporting many radio models.
- Manufacturer-Specific Software: Such as Yaesu’s VE7, ICOM’s CI-V, or Kenwood’s NEXEDGE software.
Step-by-Step Guide to Program Your Radio for Multiple Frequencies
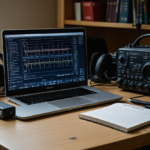
Step 1: Connect Your Radio to the Computer
Using the correct programming cable, connect your radio to your computer. Ensure drivers are installed properly and that the software recognizes your device.
Step 2: Download and Install Programming Software
Download the appropriate software for your radio model. For example, CHIRP is versatile and widely supported. Install and open the program.
Step 3: Backup Existing Settings
Before making changes, backup your current radio configuration. This step prevents data loss and allows for easy restoration if needed.
Step 4: Load or Create a New Programming File
Load an existing configuration or create a new file, depending on your needs. Begin by setting up the main channels.
Step 5: Enter the Frequencies and Settings
Input the required data for each channel. Here is an example table for multiple frequencies:
| Channel Number | Frequency (MHz) | Mode | Offset (kHz) | Repeater Direction | CTCSS/DCS | Label |
|---|---|---|---|---|---|---|
| 1 | 145.000 | FM | 0 | N/A | None | Main Local |
| 2 | 145.600 | FM | -600 | Reverse | 67.0Hz | Re transmitter |
| 3 | 146.520 | FM | 0 | N/A | None | Simplex |
| 4 | 438.800 | FM | -5 | Reverse | 88.5Hz | Repeater 2 |
Step 6: Save and Write Data to Your Radio
Once all channels are entered, save the configuration file, then upload (write) it to your radio. Follow the software instructions carefully to avoid errors.
Step 7: Test the Programmed Frequencies
After programming, verify each channel by tuning to the stored frequencies and checking for proper operation and audio clarity. Adjust settings if necessary.
Advanced Tips for Efficient Multi-Frequency Programming
Use Named Memories for Easy Identification
Label each memory with descriptive names, such as “Local Repeater” or “Emergency Channel,” to quickly access desired frequencies during operation.
Organize Frequencies into Memory Banks
If your radio supports memory banks or folders, categorize channels based on zones or usage scenarios—such as public service, contesting, or personal use.
Employ Scan Lists and Priority Channels
Set up scan lists to automatically monitor multiple frequencies, and designate priority channels for critical communications.
Utilize Cross-Referencing and Custom Macros
For digital modes or advanced radios, create macros or scripting functions to automate common operations across multiple channels.
Handling Multiple Frequencies in Different Radio Models
Yaesu Radios
Yaesu’s programming software, such as Voice-Activated Radio (VXR), provides comprehensive channel management. Use their software interface to upload bulk channels, set repeater offsets, and configure GPS features if available.
Icom Radios
Icom’s CI-V system allows for detailed programming of multiple channels, with dedicated software like CS-FI or CI-V Commander. Use the software’s batch processing features for large frequency lists.
Kentwood Radios
Kenwood’s NEXEDGE software permits extensive memory editing, including frequency groups and custom labels. Programmatically organize channels for quick recall.
Common Challenges and Troubleshooting
Firmware Incompatibility
Ensure your radio’s firmware supports programming for multiple frequencies and features. Update firmware if necessary.
Programming Cable Issues
Use the correct cable to prevent connection problems. Replace damaged cables or update driver software.
Incorrect Settings or Data Entry Errors
Double-check all frequency and parameter inputs. Cross-reference with official repeater directories or station information.
Software Conflicts or Bugs
Update to the latest version of your programming software. Close other applications that may interfere during the programming process.
Legal Considerations and Best Practices
Always verify that the frequencies you program are within authorized amateur bands and comply with local regulations. Avoid transmitting on restricted or unauthorized channels to prevent legal issues.
Maintain organized records of your programmed channels and update them regularly to reflect changes in frequencies or operating parameters.
Becoming Proficient at Multi-Frequency Programming
Programming your amateur radio for multiple frequencies is a skill that combines technical knowledge, careful planning, and practical experience. By understanding the fundamentals, utilizing the right tools, and following best practices, radio operators can significantly enhance their operational flexibility. Whether for regular communication, emergency preparedness, or contesting, mastering multi-frequency programming ensures that your radio is always ready for a diverse range of scenarios.
Practice regularly, stay updated with the latest software and firmware releases, and always adhere to legal standards. Continuous learning and experimentation will make you a more capable and efficient amateur radio operator, able to navigate the complex world of radio communications with confidence.
Похожие записи:
 Comprehensive Review of Radio Programming Software for Beginners
  Portable Spectrum Analyzers for Field Frequency Testing: A Complete Guide for Amateur Radio Enthusiasts
  How to Use Repeater Networks for Better Coverage: A Complete Guide for Amateur Radio Enthusiasts
  Latest Developments in Spectrum Licensing and Frequency Allocations: A Comprehensive Overview for Amateur Radio Enthusiasts
  Mastering Regulatory Changes: A Comprehensive Guide for Amateur Radio Enthusiasts
  Getting Started with Digital Modes like FT8 and PSK31: A Complete Guide for Amateur Radio Enthusiasts
  Mastering Your Amateur Radio Antenna: Comprehensive Guide to Tuning and Testing
  Ultimate Guide: Tips for Setting Up Your Home Radio Station
  Top Microphone and Speaker Combos for Clear Audio: The Ultimate Guide for Amateur Radio Enthusiasts
  Mastering Digital Voice Conferences: How to Participate Effectively in the Modern Amateur Radio Era
  Portable Antenna Analyzers for Precise Tuning: The Ultimate Guide for Amateur Radio Enthusiasts
  Understanding Ham Radio Frequencies and Bands: A Comprehensive Guide for Amateur Radio Enthusiasts
  How to Build a Simple Dipole Antenna at Home: A Comprehensive Guide for Amateur Radio Enthusiasts
  Top Weather-Resistant Microphones for Outdoor Use: The Ultimate Guide for Amateur Radio Enthusiasts
  Integrating Software-Defined Radio into Your Daily Operations: A Comprehensive Guide for Amateur Radio Enthusiasts
  Ultimate Guide to Upgrading Your Amateur Radio Station with New Gear: Top Tips and Strategies